So, you're diving into the world of IoT and cloud computing, huh? Let's face it, managing devices remotely can be a total headache if you don't set things up right. Access IoT SSH AWS is a game-changer for anyone working with internet-connected gadgets. Imagine being able to control your IoT devices from anywhere in the world using AWS infrastructure. That's the dream, right? But hold up—before you start tinkering around, there are a few things you need to know. In this guide, we're breaking it all down for you, step by step.
Accessing IoT devices through SSH on AWS isn't just about convenience—it's about security, scalability, and efficiency. Whether you're a tech enthusiast or a professional developer, mastering this setup can save you tons of time and headaches. This guide will walk you through everything you need to know, from configuring AWS services to securing your IoT devices like a pro. Ready to dive in?
Now, let's be real here—IoT SSH AWS isn't something you can just wing. You'll need a solid understanding of how these technologies work together. Don't worry, though—we've got your back. By the end of this article, you'll have all the tools and knowledge you need to set up a secure and efficient remote access system. So, buckle up and let's get started!
Read also:Supreme Court Ruling May Shift Power What It Means For You And The Nation
What is IoT SSH AWS and Why Should You Care?
Alright, let's break it down. IoT SSH AWS is essentially the process of using Secure Shell (SSH) to remotely access and manage IoT devices hosted on Amazon Web Services (AWS). Think of it as a superpower for managing your connected devices without needing to physically touch them. But why should you care? Well, here's the deal:
In today's fast-paced world, businesses and individuals alike need seamless ways to monitor and control their IoT devices. Whether you're running a smart home setup or managing an entire fleet of industrial sensors, having remote access is non-negotiable. AWS provides the infrastructure, while SSH ensures secure communication between your devices and the cloud. It's a match made in tech heaven!
The Importance of Secure Connections
Let's talk security for a sec. When you're dealing with IoT devices, the last thing you want is someone snooping around your network or accessing sensitive data. That's where SSH comes in. By encrypting all communication between your devices and the AWS cloud, SSH keeps your data safe from prying eyes. Plus, AWS offers robust security features that make it even harder for hackers to mess with your setup.
Here are a few reasons why secure connections matter:
- Protects sensitive data from unauthorized access.
- Ensures compliance with industry regulations.
- Reduces the risk of costly breaches or downtime.
Setting Up AWS for IoT SSH Access
Before you can start accessing your IoT devices via SSH on AWS, you'll need to set up your AWS environment properly. This involves configuring a few key services, such as AWS IoT Core, EC2 instances, and security groups. Sounds complicated? Don't sweat it—we'll walk you through each step.
Step 1: Create an AWS Account
If you haven't already, sign up for an AWS account. You'll get access to a bunch of free services for the first year, which is perfect for testing and experimenting. Once you're logged in, navigate to the AWS Management Console and familiarize yourself with the layout. It might look overwhelming at first, but trust us—it gets easier with practice.
Read also:Angels New Player Demoted Early A Shocking Turn Of Events
Step 2: Configure AWS IoT Core
AWS IoT Core is the backbone of your IoT setup. It allows you to connect, manage, and interact with your devices securely. To get started, create a new IoT thing in the AWS IoT Core console. This "thing" represents your IoT device in the cloud. Make sure to assign it a unique name and attach any necessary policies or certificates for authentication.
Understanding SSH and Its Role in IoT
SSH, or Secure Shell, is a cryptographic network protocol that enables secure communication over unsecured networks. In the context of IoT, SSH allows you to remotely access and manage your devices without compromising their security. Here's how it works:
When you initiate an SSH connection, your client (e.g., your laptop) sends an encrypted request to the server (e.g., your IoT device). The server then verifies the request using a public-private key pair, ensuring that only authorized users can access the device. This process happens in the background, so you don't have to worry about the technical details unless you're troubleshooting.
Benefits of Using SSH for IoT
Here are some of the key benefits of using SSH for IoT:
- Enhanced security through encryption.
- Reliable communication even over unstable networks.
- Support for multiple authentication methods.
Securing Your IoT Devices with AWS
Now that you understand the basics of IoT SSH AWS, let's talk about securing your devices. Security should always be your top priority when dealing with IoT setups. Here are a few best practices to keep your devices safe:
1. Use Strong Authentication
Always use strong passwords or key-based authentication for your devices. Avoid using default credentials, as these are often the first thing attackers look for. Additionally, consider enabling two-factor authentication (2FA) for an extra layer of security.
2. Limit Access with Security Groups
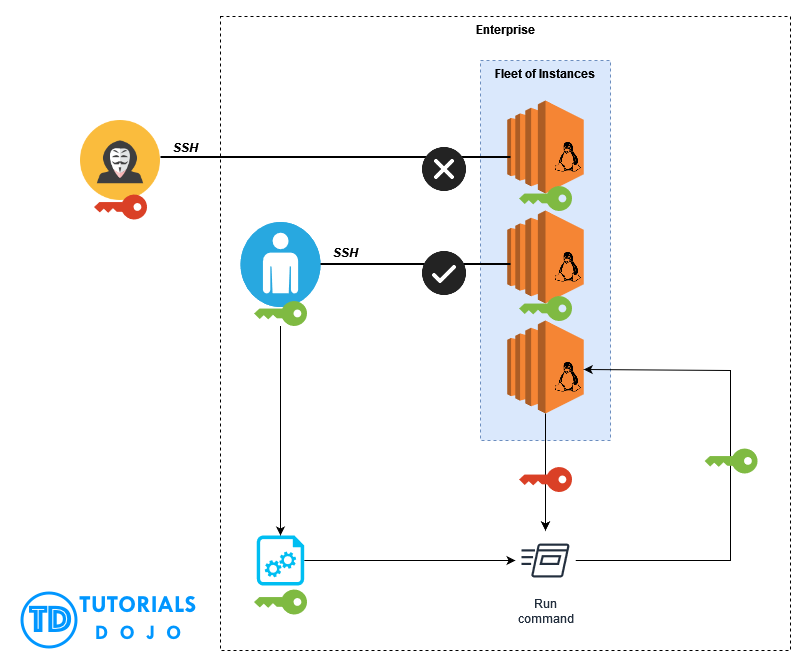
AWS security groups act as virtual firewalls for your EC2 instances. By configuring these groups properly, you can control which IP addresses and ports are allowed to access your devices. For example, you might restrict SSH access to your personal IP address or a specific range of trusted addresses.
Setting Up SSH Access for IoT Devices
Alright, let's get into the nitty-gritty of setting up SSH access for your IoT devices. This process involves a few key steps, including generating SSH keys, configuring your devices, and testing the connection. Follow along closely, and you'll have everything up and running in no time.
Step 1: Generate SSH Keys
First, you'll need to generate an SSH key pair. This consists of a public key and a private key. The public key will be added to your IoT device, while the private key will remain on your local machine. To generate the keys, open your terminal or command prompt and run the following command:
ssh-keygen -t rsa -b 4096 -C "your_email@example.com"
This will create a new RSA key pair with a length of 4096 bits. Make sure to save the keys in a secure location and never share your private key with anyone.
Step 2: Configure Your IoT Device
Next, you'll need to configure your IoT device to accept SSH connections. This typically involves adding your public key to the device's authorized_keys file. The exact steps will depend on the operating system and hardware of your device, but most Linux-based systems follow a similar process.
Step 3: Test the Connection
Once everything is set up, it's time to test the connection. Open your terminal or SSH client and run the following command:
ssh username@device_ip_address
If everything is configured correctly, you should be able to log in to your device without entering a password. If you encounter any issues, double-check your settings and try again.
Best Practices for IoT SSH AWS
To ensure a smooth and secure experience with IoT SSH AWS, follow these best practices:
- Regularly update your devices and software to patch any security vulnerabilities.
- Monitor your AWS usage and set up alerts for unusual activity.
- Document your setup process so you can easily replicate it in the future.
Common Challenges and How to Overcome Them
Let's face it—working with IoT SSH AWS isn't always a walk in the park. Here are a few common challenges you might encounter and how to overcome them:
Challenge 1: Connectivity Issues
If you're having trouble connecting to your IoT device, check the following:
- Ensure your device is online and reachable via its IP address.
- Verify that your security groups and firewall rules allow SSH traffic.
- Try restarting your device or network equipment.
Challenge 2: Security Concerns
Security is always a top priority. To address any concerns:
- Regularly review your access logs for suspicious activity.
- Implement strict access controls and least privilege principles.
- Stay informed about the latest security best practices and updates.
Conclusion: Take Action Today
And there you have it—a comprehensive guide to accessing IoT devices via SSH on AWS. By following the steps outlined in this article, you can set up a secure and efficient remote access system that meets all your needs. Remember, the key to success lies in preparation, so take the time to plan your setup carefully and test everything thoroughly.
Now, here's the fun part: it's your turn to take action! Whether you're managing a smart home, monitoring industrial equipment, or experimenting with new IoT projects, IoT SSH AWS has the potential to revolutionize the way you work. So, what are you waiting for? Get out there and start building!
Oh, and don't forget to leave a comment or share this article if you found it helpful. We'd love to hear your thoughts and answer any questions you might have. Happy tinkering!
Table of Contents